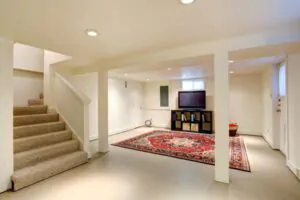
Tired of your gloomy, unfinished basement? You’re not alone. Many homeowners dream of turning their dark, damp basements into cozy living spaces. But the thought of tackling basement walls can be overwhelming.
Don’t worry – we’ve got you covered.
Did you know that finishing your basement walls can boost your home’s value by up to 70%? That’s a great return on investment. This guide will walk you through simple ways to frame and finish your basement walls.
We’ll cover everything from waterproofing to drywall installation. Ready to learn how to finish a basement wall? Let’s get started.
Key Takeaways
- Finishing basement walls can boost home value by up to 70%, making it a smart investment.
- Address moisture issues and get proper permits before starting the project to avoid future problems.
- Essential tools include an air compressor, caulk gun, circular saw, and safety gear like hearing protection and safety glasses.
- Key steps involve waterproofing, insulating, framing, installing drywall, and applying final finishes and paint, which all contribute to the cost to finish your basement.
- DIY basement finishing can save money, but professional help may be needed for complex tasks like foundation repairs, which can cost $250 to $7,300.
Preparing Your Basement
Before you start, check your basement for water issues. Fix any leaks and install a sump pump if needed. Get the right permits from your local building department to avoid fines later.
Address Moisture Issues
Moisture issues can ruin your basement project. Check for dampness on humid days. This might be normal, but standing water or leaks need fixing right away. Simple solutions include repairing gutters and downspouts or adjusting your yard’s slope.
These changes help move water away from your home’s foundation.
For serious problems, you may need to install drain tiles or waterproof your basement walls. These jobs often involve digging around your house or removing part of the concrete floor.
A quick test can help you spot moisture trouble. Tape a 1-square-foot plastic sheet to your basement wall. After a few days, check under the sheet. If it’s wet, you have a moisture problem to solve before starting your project.
Apply for Necessary Permits
Permits are vital for big basement changes. You need them for new walls, plumbing, or wiring. Talk to a building inspector first. They’ll guide you on local rules and what permits you need.
Getting permits costs money. The average price in the U.S. is $1,602. But it can range from $1,000 to $2,000. This cost covers checks to make sure your work is safe and legal.
Good planning is half the work.
Skipping permits can lead to big trouble. You might face fines or have to redo work. Worse, it could make your home unsafe. Play it safe and get the right permits before you start.
It’s worth the time and money in the long run.
Tools and Materials Needed
You’ll need the right gear to finish your basement wall. Get ready to gather tools and materials for your project.
List of Essential Tools
Finishing a basement wall requires the right tools. Here’s a list of must-have items for your DIY project:
- Air compressor and hose: For powering nail guns and other pneumatic tools.
- Caulk gun: To apply adhesives and sealants for waterproofing.
- Chalk line: For marking straight lines on walls and floors.
- Circular saw: To cut lumber for framing and trim work.
- Corded drill: For driving screws and making holes in wood and concrete.
- Extension cord: To power tools in areas far from outlets.
- Framing square: For marking and checking right angles.
- Hammer: For manual nailing and prying.
- Hearing protection: To guard against loud noises from power tools.
- Knee pads: To protect your knees while working on the floor.
- Level: To ensure walls and surfaces are straight.
- Safety glasses: To shield your eyes from debris.
- Tape measure: For precise measurements of materials and spaces.
- Utility knife: For cutting drywall, insulation, and other materials.
Required Building Materials
Finishing your basement walls requires the right materials. Here’s a list of essential items you’ll need for your DIY project:
- Lumber: 2×4 green-treated lumber for bottom plates and 2×4 regular lumber for studs and top plates.
- Rigid insulation: Foam boards to insulate concrete walls and prevent moisture.
- Vapor barrier: Plastic sheeting to block moisture from seeping through walls.
- Drywall: Standard 1/2-inch panels for wall covering.
- Drywall screws: 1-1/4 inch screws to attach drywall to studs.
- Joint compound: For taping and finishing drywall seams.
- Drywall tape: Paper or mesh tape for covering joints.
- Paint: Primer and finish coat for final wall treatment.
- Nails or screws: For framing and attaching plates to concrete.
- Construction adhesive: To secure insulation and framing to concrete walls.
- Electrical boxes and wiring: For adding outlets and switches.
- Fiberglass insulation: To fill wall cavities for better energy efficiency.
Steps to Finish a Basement Wall
Finishing a basement wall takes several steps. You’ll need to waterproof, insulate, frame, and drywall before adding final touches.
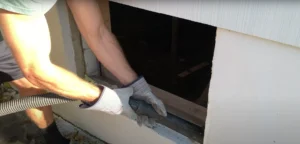
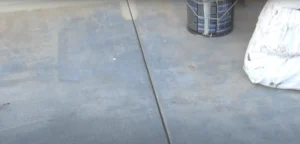
Waterproof the Walls
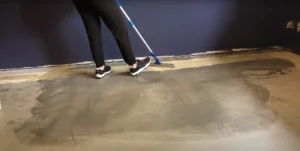
Waterproofing basement walls is a crucial step in finishing your space. Start by applying a masonry waterproofing product with a paint roller. This creates a barrier against moisture.
Next, tackle the outside. Install gutters and downspouts to direct water away from your home. Improve grading around your foundation to ensure proper drainage. For extra protection, consider adding a French drain or sump pump.
Don’t forget to seal any cracks in the walls or floor. These steps will help keep your basement dry and ready for the next phase of your project.
Install Insulation
Insulation forms a key part of basement finishing. You’ll need to choose the right type for your space. XPS foam insulation works well for basements. Apply it vertically to the walls using adhesive.
This method helps keep moisture out and warmth in.
Other options exist too. Bubble foil, fiberglass, and spray foam can all do the job of insulating your exterior wall effectively. Each has pros and cons. Pick based on your budget and needs. Good insulation makes your basement cozy and cuts energy costs.
Don’t skip this vital step in your project.
Frame the Wall
Framing your basement wall starts with marking a guideline. Snap a chalk line 4 inches from the foam insulation. This line will help you place the bottom plate. Leave a 1/2-inch gap between the foam and the bottom plate to prevent moisture issues.
Next, build your wall frame. Measure the height from floor to joist at several points. Make your wall 1/4 inch shorter than the smallest measurement. This allows for any unevenness in the floor or ceiling.
Assemble the frame with pressure-treated lumber for the bottom plate and regular studs spaced 16 inches apart.
Tip the completed frame into place against the wall. You may need to adjust for sagging joists or ductwork. Secure the frame by nailing it to the floor and attaching it to the blocking between the ceiling joists.
Use a level to ensure your new wall stands straight and true. With the frame in place, you’re ready to add electrical wiring and drywall.
Install Drywall
Hanging drywall marks a big step in finishing your basement walls. Start by measuring and cutting sheets to fit your framed walls, ensuring a perfect way to finish the installation. Use a utility knife to score the drywall, then snap it along the cut line.
Attach the sheets to the studs with drywall screws, spacing them about 8 inches apart. Don’t forget to cut holes for outlets and switches before hanging.
Next, tape the seams between drywall sheets. Apply a thin layer of joint compound over the tape, then smooth it out with a drywall knife. Let it dry completely before sanding. You’ll need to apply at least two more coats of compound, sanding between each layer.
This process creates a smooth surface ready for paint or other finishes.
For a pro-level finish, consider using moisture-resistant drywall in areas prone to dampness. Add backers between studs to provide extra nailing surfaces where needed. These steps help create a durable, long-lasting wall that looks great and stands up to basement conditions.
Apply Final Finishes and Paint
After drywall installation, it’s time for the fun part – finishing touches! Sand the walls smooth and apply a coat of mold-killing primer. Zinsser’s or Kilz products work great for this step.
Once dry, paint your walls with waterproof paint to keep moisture at bay. Choose colors that brighten up your space and make it feel cozy, complementing the way to finish your basement walls.
Don’t forget the little details that make a big difference. Install baseboards to cover gaps between walls and floors. Add GFCI outlets for safety in damp areas. These final touches transform your basement from a bare space into a comfortable room you’ll love to use.
Framing Techniques for a Polished Look
Framing your basement walls right makes a big difference. Learn smart tricks to get a clean, pro look in your space.
Building In Place vs. Assembling on the Ground
Framing basement walls offers two main methods: building in place or assembling on the ground. Each approach has its pros and cons. Here’s a comparison:
| Building in Place can be an efficient method for creating a stud wall in your basement. | Assembling on the Ground |
|---|---|
| Allows for precise fitting to uneven floors | Faster assembly process |
| Better for working around obstacles | Easier to ensure stud crowns face the same direction |
| Requires more vertical working space | Less strain on the back during construction |
| Can be challenging in tight spaces | May need help lifting and positioning the wall |
| Ideal for “stick framing” around windows | Better for long, straight wall sections |
Choose the method that fits your space and skill level. Building in place works well for tricky areas, while ground assembly speeds up the process for simple walls. It’s important to check local building codes before starting your project.
Tips for Framing Inside Corners
Framing inside corners needs care and skill. Start by placing a stud flush against the wall at each corner. This creates a solid base for attaching drywall. Next, add a second stud about an inch away from the first.
This gap lets you screw in drywall on both sides of the corner.
For extra strength, use metal corner beads. These protect the drywall edges and make crisp, clean lines. Nail them in place before taping and mudding. Don’t forget to check for plumb as you work.
Use a level often to ensure straight corners. Straight corners make the whole room look better.
Overlap the last stud for drywall backing. This gives you a firm surface to attach the drywall sheets. It also helps prevent cracks in the corner over time. With these tips, your inside corners will look pro and last for years.
Techniques for Building Out Around Windows
Building out around windows in your basement needs care. First, install wood framing around the window opening. Use treated lumber to resist moisture. Tape the seams where the wood meets the concrete for extra protection.
This step stops water from seeping in later.
Next, attach the boards to the wall. Apply construction adhesive to the back of each board. Then, secure them with concrete screws. This method creates a solid frame for your window.
It also helps insulate the area around the window, making your basement cozier.
Professional vs. DIY Approaches
DIY basement finishing can save money but requires time and skill. Hiring pros ensures quality work and saves time, but costs more.
When to Consider Professional Help
Professional help becomes crucial for complex basement tasks. Fixing foundation cracks, repairing leaks, or addressing sinking foundations often require expert skills. These jobs can cost between $250 and $7,300, depending on the issue’s severity.
Experts bring specialized tools and knowledge to tackle tricky problems. They can spot hidden issues that might escape a DIY eye. For tasks like drywall installation, pros charge $500 to $5,600.
This cost often includes materials and labor, saving you time and potential mistakes.
Safety concerns also call for professional aid. Electrical work, plumbing, or structural changes need proper permits and inspections. Pros understand local codes and can ensure your project meets all legal requirements.
They also carry insurance, protecting you from liability if something goes wrong during the renovation.
Benefits of DIY
DIY basement finishing offers huge cost savings. You’ll skip labor fees and only pay for tools and materials. This means more money in your pocket for other home upgrades or fun activities.
Tackling the project yourself builds valuable skills. You’ll learn framing, drywall installation, and basic electrical work. These skills come in handy for future home repairs and improvements.
Plus, you’ll feel a sense of pride each time you enjoy your newly finished space.
Finishing your own basement gives you total control over the design. You can create custom storage solutions, add unique features, or design the perfect layout for your needs. This freedom lets you craft a space that truly fits your family’s lifestyle and preferences.
Conclusion
Finishing your basement walls can add value and comfort to your home. With the right tools and steps, you can transform a damp space into a cozy room. It’s essential to address moisture issues first and obtain proper permits.
Frame, insulate, and drywall your walls for a polished look. Whether you choose to do it yourself or hire help, a finished basement offers many possibilities. Your new space is ready – pick up your hammer and begin the project!
FAQs
1. What tools do I need to frame a basement wall?
You’ll need a tape measure, level, hammer, nail gun, circular saw, and drill. Don’t forget safety gear like gloves and goggles. For wall framing, gather wood for studs, top and bottom plates, and fasteners.
2. How do I start framing my basement walls?
Begin by measuring and marking stud locations on the top and bottom plates. Assemble the wall on the floor, then raise it into place. Attach the top plate to floor joists and the bottom plate to the basement floor. Use a level to ensure everything is straight.
3. What’s the best way to deal with moisture in basement walls?
Before framing, address any water problems. Install a waterproof barrier like a sheet of plastic between the foundation wall and new framing. This helps prevent mold and mildew. For damp areas, consider using treated lumber for the bottom plate.
4. How do I work around pipes and ducts when finishing basement walls?
Plan your framing to accommodate existing pipes and ducts. You may need to build soffits or create access panels. Always leave enough space for maintenance. If needed, consult a general contractor for complex layouts.
5. What are some affordable options for finishing basement walls?
Consider alternatives to drywall like paneling, board and batten, or tongue and groove boards. These can be more budget-friendly and easier for DIY installation. Some modular basement wall systems also offer cost-effective solutions.
6. Do I need permits to finish my basement walls?
Check local building codes before starting your basement remodel. Many areas require permits for structural changes, electrical work, or plumbing modifications. Getting proper permits ensures your finished basement is safe and up to code.