Are you tired of staring at those dull, gray concrete walls in your basement? You’re not alone. Many homeowners dream of turning their cold, uninviting basement into a cozy living space.
But the thought of tackling concrete walls can be overwhelming.
Did you know that finishing your basement can increase your home’s value by up to 70%? It’s true! This article will show you easy ways to finish concrete basement walls and transform your space.
We’ll cover everything from waterproofing to painting, so you can create the basement of your dreams. Ready to learn how to finish concrete basement walls? Let’s get started!
Key Takeaways
- Finishing basement walls can boost home value by up to 70%.
- Waterproofing is vital to prevent moisture damage and mold growth.
- Framing, insulating, and installing drywall transforms concrete walls into livable spaces.
- Mold-resistant paint helps protect against moisture issues in basements.
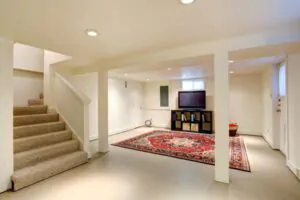
- Adding personal touches like art, rugs, and shelves makes the space cozy and functional.
Managing Moisture and Waterproofing
Proper moisture management keeps your basement dry and cozy. Waterproofing prevents water damage and mold growth in your new space.
Seal Walls to Block Moisture
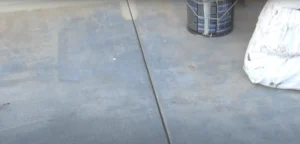
Moisture problems in basements can lead to peeling paint and water seepage, which can be mitigated by using sealant. Sealing your walls is a crucial step to block moisture and protect your space.
- Clean the walls thoroughly. Remove loose paint, efflorescence, and debris for better paint adherence.
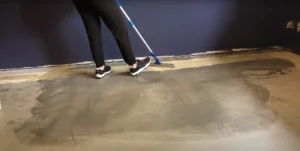
- Apply a waterproof concrete or masonry paint like Dry Lock. This special paint helps seal minor water seepage issues.
- Use a roller or brush to apply the first coat evenly. Make sure to cover all areas of the wall surface.
- Allow the first coat to dry completely. This usually takes about 24 hours, but check the product label for exact drying times.
- Apply a second coat of waterproof paint. Multiple coats may be needed to seal the wall and cover stains fully.
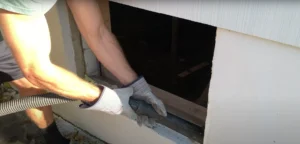
- Pay extra attention to problem areas, especially where the joist meets the wall. Focus on spots where you’ve noticed moisture issues in the past.
- Let the final coat dry for at least 48 hours before touching or decorating the walls.
- Avoid using standard paint over efflorescence. This can cause bubbling and peeling of the paint later on.
- Check the walls regularly for signs of new moisture problems. Early detection can prevent bigger issues down the line.
- Consider adding a dehumidifier to your basement. This helps control moisture levels and prevents future water damage, especially when you paint the concrete.
Practical Installation Techniques
Frame your basement walls, add insulation, and install drywall to create a cozy living space. Read on to learn the step-by-step process for finishing your basement walls.
Frame, Insulate, and Install Drywall
Framing, insulating, and installing drywall are key steps in finishing your basement walls. These tasks transform bare concrete into cozy living spaces.
- Measure the basement space with a laser for accuracy. Cut studs to the right height.
- Use a framing nailer to attach studs to the bottom plate. Secure the plate to the concrete foundation.
- Space studs 16 or 24 inches apart. This fits standard insulation and drywall sizes.
- Add extra studs where drywall joints will be. This stops cracks and movement.
- Build bulkheads to hide heating and cooling systems. Use adhesive around steel beams.
- Check all lines with a laser level. Keep walls straight and parallel for a good look.
- Install insulation between the studs. Choose moisture-resistant options for basements.
- Cut drywall panels to fit the framed walls. Use screws to attach them to the studs.
- Tape and mud the drywall seams. Sand smooth for a finished surface.
- Apply a coat of mold-resistant primer. This helps protect against moisture issues.
- Paint the walls with your chosen color. Pick a finish that suits your new basement space.
Options for Painting and Decorating
Paint your basement walls with mold-resistant paint to guard against moisture. Add your personal touch with colorful accents, artwork, or textured finishes to create a cozy space.
Select Mold-Resistant Paint and Personalize Your Space
Mold-resistant paint is a game-changer for basement walls. It kills mold spores on contact and keeps your space fresh and clean.
- Choose the right paint: Pick a high-quality mold-resistant paint made for damp areas. These paints often contain special chemicals that stop mold growth.
- Prep the surface: Clean the walls well and fix any cracks or holes. This step helps the paint stick better and last longer.
- Apply primer: Use a mold-resistant primer to create a strong base for your paint. This extra layer adds more protection against moisture.
- Paint in thin layers: Apply two or three thin coats of paint instead of one thick coat. This method gives better coverage and helps the paint dry faster.
- Let it dry fully: Allow each coat to dry completely before adding the next. Good air flow speeds up drying and cuts down on moisture.
- Add personal touches: Once the paint is dry, hang art or photos to make the space your own. Use frames that can handle some moisture.
- Use proper lighting: Install bright lights to make the space feel bigger and more welcoming. Good lighting also helps you spot any mold growth early.
- Add area rugs: Place rugs on the floor to add warmth and style. Choose rugs that can handle damp conditions and are easy to clean.
- Install shelving: Put up shelves to display items and keep things off the floor. This step helps air flow and makes cleaning easier.
- Maintain the space: Check the walls often for signs of mold or moisture. Quick action can stop small issues from becoming big problems.
Conclusion
Finishing concrete basement walls can be a fun and rewarding project. With the right tools and steps, you can turn a dull space into a cozy room. Waterproofing is key to keep your new area dry and comfy.
Paint and decor will add your personal touch to the space. Your newly finished basement will give you more living space to enjoy for years to come.
FAQs
1. What are some easy ways to finish concrete basement walls?
Easy ways to finish concrete basement walls include painting with Drylok masonry waterproofer, installing rigid foam insulation, building a stud wall, or using a modular basement wall system. These methods can transform your unfinished basement into a cozy living space.
2. How do I waterproof my basement before finishing the walls?
To waterproof your basement, start by fixing any water problems. Make sure gutters and downspouts direct water away from the house. Apply a waterproof coating like Drylok to the concrete walls. For extra protection, install a drainage system if needed.
3. What materials do I need to frame basement walls?
For framing basement walls, you’ll need pressure-treated lumber for the bottom plate, regular lumber for studs and top plate, rigid foam board insulation, vapor barrier, and drywall. Don’t forget fasteners, tools, and safety gear for this DIY project.
4. How much does it cost to finish a basement per square foot?
The cost to finish a basement varies, but expect to pay $25 to $50 per square foot on average. This includes materials for walls, flooring, and basic finishing. Costs may increase for electrical work, plumbing, or high-end finishes.
5. Do I need a permit to finish my basement?
Most areas require a permit for basement finishing. Check local building codes before starting your project. Permits ensure your work meets safety standards for electrical wiring, ventilation, and fire safety. Skipping this step can lead to fines or issues when selling your home.
6. What insulation should I use for basement walls?
For basement walls, use rigid foam board insulation or spray foam insulation. These options provide a moisture barrier and good R-value. Install the insulation directly against the concrete wall before framing. This helps prevent condensation and mold growth.