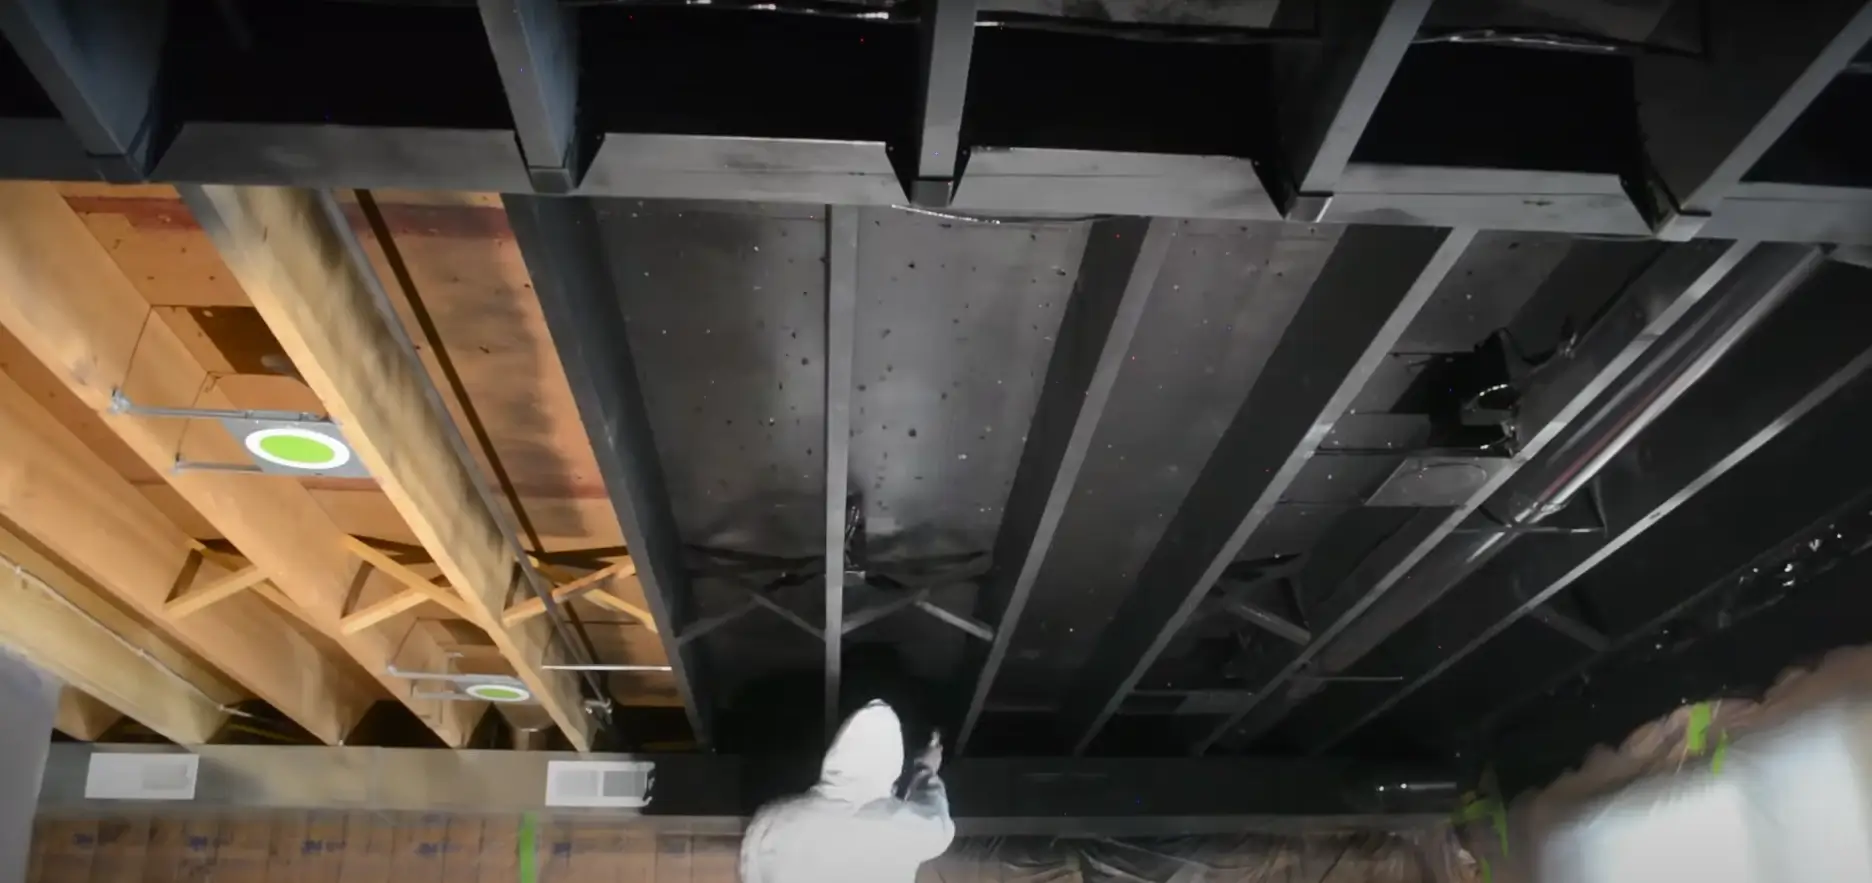
Are you tired of your dull basement ceiling? A fresh coat of paint can work wonders. Many homeowners want to update their basements but don’t know where to start, especially when it comes to painting everything. Painting the ceiling is a great first step.
Did you know that painting your basement ceiling can make the space feel bigger? It’s true that painting the basement ceiling can transform the space! This article will show you how to paint your basement ceiling for a stunning exposed look.
We’ll cover everything from prep work to final touches. Ready to transform your basement?
Key Takeaways
- Painting your basement ceiling can make the space feel bigger and hide pipes and wires.
- Valspar 2000 Flat Black Interior paint is a good choice for basement ceilings, often needing just one coat.
- Use a paint sprayer like the Wagner Spraytech Flexio 5000 for quick, even coverage on large areas.
- Protect floors and walls with drop cloths and plastic sheeting before painting.
- Install black can lights or track lighting to enhance the look of your newly painted basement ceiling.
Preparing Your Basement Ceiling for Painting
Get ready to transform your basement ceiling! First, tidy up electrical wires and clean those dusty ceiling joists. This prep work sets the stage for a smooth painting process.
Organizing Electrical Wires
Tidy wires make painting easier and safer. Start by unplugging all devices and using cord staples to pin wires neatly along joists to ensure safety during your basement remodel. Group similar wires together and label them for easy identification.
This step improves the look of your exposed ceiling and helps prevent accidents during painting, particularly in a basement remodel. It’s important to leave some slack in the wires to allow for future changes or repairs.
Once the wires are organized, you can focus on Painting without concerns can help you achieve a look great finish in your basement remodel.. A clean, well-arranged electrical system also makes it easier to add new lighting fixtures later. This simple task can greatly improve both the function and style of your basement space.
Cleaning and Dusting the Ceiling Joists
Grab a broom or leaf blower to clean your ceiling joists before you paint the basement ceiling. These tools work great for removing loose dirt and cobwebs. Next, use a shop vacuum to suck up any remaining dust and debris.
This step is key to ensure the paint sticks well to the surface. A clean ceiling also helps you spot any issues like cracks or water damage that need fixing before painting.
Don’t forget to wear safety gear like goggles and a mask while cleaning. Dust and dirt can fall into your eyes or mouth, which isn’t fun. If you have exposed insulation, be extra careful not to disturb it.
Once you’re done, your joists should look much cleaner and ready for their new paint job.
Choosing the Right Paint and Tools
Picking the right paint and tools is key for a great basement ceiling. You’ll need to choose between black paint options and decide on airless sprayers or brushes for application.
Selecting the Perfect Black Paint
Choosing the right black paint for your basement ceiling is key. Valspar 2000 Flat Black Interior paint works great for this job. It covers well and only needs one coat. This paint hides flaws and gives a sleek look to your ceiling.
For touch-ups, you can use a brush or roller. Flat black paint helps hide pipes and wires in your ceiling. It also makes the space feel bigger. Make sure to pick a paint that can handle moisture in basements.
Options for Sprayers and Brushes
Painting your basement ceiling can be a breeze with the right tools. Let’s explore your options for sprayers and brushes:
- Paint Sprayers:
- Wagner Spraytech Flexio 5000 paint sprayer is a top choice
- Set material flow to 9-11 and air power to medium-high
- Covers large areas quickly and evenly
- Great for textured or uneven surfaces, which often require multiple coats of primer.
- Reduces paint waste and drips
- Airless Paint Sprayers:
- Ideal for big basement projects, especially when you want to paint a basement ceiling.
- Sprays paint at high pressure without air
- Provides smooth, even coverage
- Works well with thicker paints
- Paintbrushes:
- Best for small areas and touch-ups
- Use angled brushes for corners and edges
- Choose synthetic bristles for latex paint
- Natural bristles work well with oil-based paints
- Paint Rollers:
- Good for flat, smooth ceilings when you choose the right paint color.
- Use a long-handled roller for easy reach
- Pick a nap length based on ceiling texture
- Foam rollers give a smooth finish
- Extension Poles:
- Attach to rollers or brushes for high ceilings
- Reduces strain on your back and arms
- Helps you reach tough spots without a ladder
- Paint Pads:
- Flat, rectangular tools with short fibers
- Good for smooth ceilings and edges
- Leaves fewer streaks than rollers
- Easy to control and maneuver
Step-by-Step Painting Process
Ready to paint your basement ceiling? Protect your floors and walls first. Use drop cloths and tape to cover everything below the ceiling.
Protecting Surrounding Areas
Before you start painting, cover your floors and walls. Use drop cloths to shield the floor from paint drips. Hang plastic sheeting on walls to stop overspray. This step is key to keeping your basement clean during the project.
It also saves time on cleanup later.
Don’t forget to cover any items you can’t move out of the room. Wrap furniture in plastic or old sheets. Tape off areas you don’t want to be painted, like outlets or pipes. These steps will protect your stuff and make the painting process smoother.
Applying Paint with a Sprayer or Brush
Grab your paint sprayer and get ready to transform your basement ceiling! This tool makes quick work of large areas, letting you cover more space in less time, making it ideal for the first coat. Start by testing the sprayer on a piece of cardboard to get the hang of it.
Move the sprayer in steady, even strokes for the best coverage. Don’t forget those hard-to-reach spots!
For touch-ups or smaller areas, a brush or roller works great. Use a high-quality brush to cut in around edges and fixtures. Roll paint onto flat surfaces for a smooth finish, especially when applying the first coat. Two coats usually do the trick, but check the paint can for specific instructions.
With these tips, you’ll have a stunning exposed basement ceiling in no time!
Enhancing Lighting in Your Painted Basement
Proper lighting makes a huge difference in a painted basement. You can install track lights or recessed fixtures to brighten up the space.
Installing Appropriate Lighting Fixtures
Lighting can make or break your basement’s look. Here’s how to install the right fixtures for your newly painted ceiling:
- Choose the right fixtures: Pick black can lights to match your painted ceiling. These blend in well and create a sleek look.
- Plan your layout: Space lights evenly across the ceiling. This ensures good coverage and avoids dark spots.
- Install dimmer switches: Add these to control light levels. They help create the right mood for different activities, especially when you select the ideal paint color.
- Use LED bulbs: These save energy and last longer. They also produce less heat, which is good for basements with low ceiling height.
- Add accent lighting: Use wall sconces or table lamps to highlight specific areas. This creates depth and interest in your space.
- Consider track lighting: This type of lighting is flexible and works well with exposed ceilings. You can adjust the lights as needed.
- Install pendant lights: These can add style and focus light on key areas like a bar or game table.
- Use rope lights: Hide these along beams or in corners for a soft, ambient glow. They can make your basement feel cozy.
- Add task lighting: Put lights over workspaces or reading nooks. This helps with specific activities in your basement.
- Test before final install: Try different light positions before fixing them in place. This helps you find the best setup for your space, including how to paint the walls and ceiling.
Basement Design Considerations with Painted Ceilings
Painted basement ceilings open up new design options. Black ceilings create a sleek, modern look that hides pipes and wires. They also make the space feel bigger. White ceilings brighten the room and reflect light, perfect for low basements.
Choose colors that match your style and the room’s purpose. Add exposed beams or rafters for a rustic touch. This DIY project can save money on drop ceilings or drywall.
Lighting plays a key role in painted ceilings. Install fixtures that complement the ceiling color and style. For black ceilings, use bright, focused lights to create contrast. White ceilings work well with softer, diffused lighting.
Consider track lighting or recessed lights for flexibility. These choices can turn your basement into a stunning, functional space.
Conclusion and Final Touches
Painting your basement ceiling can transform your space. With the right tools and techniques, you’ll create a striking exposed look. This DIY project saves money and adds character to your home.
Proper preparation, selecting the appropriate paint, and safeguarding your surroundings are essential steps for a successful basement remodel. Your newly painted ceiling will give your basement a fresh, modern feel that you’ll appreciate for years to come.
FAQs
1. What are the pros and cons of painting an exposed basement ceiling black?
Painting your basement ceiling black can hide wires and pipes, making the space look sleek. It also adds height to low ceilings, especially when using white paint. But it may darken the room and require more coats of paint. Think about your goals before choosing this bold look.
2. How do I prepare my unfinished basement ceiling for painting?
Start by cleaning the ceiling and fixing any issues. Cover the floor and walls with drop cloths. Use a primer made for bare wood or metal surfaces. This helps the paint stick better. Wear a respirator and goggles for safety.
3. What kind of paint works best for an exposed basement ceiling?
Flat paint is ideal for exposed ceilings. It hides imperfections and doesn’t reflect light. Choose a paint that works on multiple surfaces like wood, metal, and ductwork. Some paints even have built-in primer to save time.
4. Should I use a paint sprayer or roller for my DIY basement ceiling project?
A paint sprayer is faster and reaches nooks and crannies better. It’s great for textured or uneven surfaces. But it needs practice and can be messy. Rollers are easier to control and work well for smooth ceilings. Pick based on your skill level and ceiling type.
5. How much paint do I need for my basement ceiling?
Measure your ceiling’s square footage. One gallon usually covers 350-400 square feet. For exposed ceilings with lots of beams and pipes, you’ll need more paint to cover the entire basement. Plan for at least two coats. It’s better to have extra paint than to run out mid-project.
6. Can I paint over the insulation in my basement ceiling?
It’s not recommended to paint directly on insulation; instead, consider painting the basement ceiling black for a dramatic effect. If you have exposed insulation, consider covering it with plywood or drywall first. This creates a smooth surface for painting and improves energy efficiency. Always check local building codes before making changes.

