Is your basement a dark and underused space? Many homeowners face the challenge of transforming their basements into functional areas that add value to their homes. Common problems include moisture, water damage, and design hurdles.
One important fact: Total Basement Finishing offers specialized services including waterproof floors and insulated walls customized for basements. These features make it easier to turn your basement into a cozy living space.
This article will guide you through every step of basement finishing. From pre-planning and layout considerations to choosing materials and installation tips, we cover it all. Ready to start? Let’s transform your basement!
Key Takeaways
- Identify and Repair Moisture Issues: Before starting, check for moisture signs like mold or stains. Fix leaks, cracks, and use waterproofing products.
- Consider Design Layouts: Plan your basement layout to maximize functionality. Include separate zones for different activities such as recreation or storage.
- Choose Durable Materials: Use moisture-resistant materials like metal studs and treated lumber. Opt for gypsum board and modular tiles instead of conventional materials prone to water damage.
- Install Egress Windows: Adding egress windows enhances safety by providing an emergency exit route while increasing natural light in the basement.
- Incorporate Soundproofing Solutions: To create a quiet space, install soundproof insulation in walls and ceilings. Consider thick carpets with padded underlays for floors.
Pre-Planning Your Basement Renovation
Ensure your basement is free from moisture and water problems. Check for any damage that needs repair before starting your renovation.
Evaluate moisture and water issues
Basements often face moisture and water issues that can lead to bigger problems if not addressed. Check for any signs of water damage like discoloration, stains, or mold growth on walls and floors.
Use a moisture meter to measure the dampness level in different areas. Look out for possible sources such as leaking pipes, cracks in foundation walls, or ineffective sump pumps.
Ensure proper waterproofing methods before starting your basement finishing project. Install drainage systems around the perimeter of the basement floor and consider using industry-leading technologies like Basement Systems’ waterproof wall panels and flooring.
Replace conventional building materials prone to damage with more resilient options such as gypsum board and modular tiles.
Moisture-resistant materials are non-negotiable when you’re dealing with basements, says home renovation expert Jane Collins.
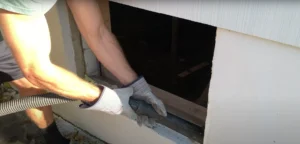
Inspect critical areas like doors and windows where water might seep through. Seal all gaps adequately and replace worn-out weather stripping. Adding foam insulation can also help maintain temperature control while protecting against condensation buildup on cold surfaces like metal piping or concrete slabs.
Inspect and repair critical areas
Inspecting and repairing critical areas in your basement is crucial. Start by looking for any signs of dampness or water damage on the walls and floors. These issues usually indicate problems with the foundation, which can lead to more serious complications if not addressed promptly.
Use a flashlight to check every corner and crevice for moisture, mold, or cracks.
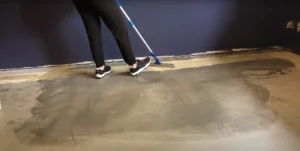
Waterproofing is essential after identifying problem areas. Fill foundation cracks with hydraulic cement, which expands as it dries, ensuring a tight seal against water seepage. Consider applying a waterproof coating to the entire surface area to provide an additional layer of protection.
This step is vital in maintaining a dry environment suitable for finishing projects.
Proper planning also involves addressing electrical and plumbing needs before proceeding further with renovations. Install moisture-resistant materials such as fiberglass insulation and drywall suited for high-humidity environments to prevent future deterioration.
Once these repairs are complete, you can confidently move forward knowing that your basement is safeguarded against potential water issues.
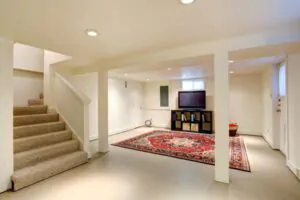
Design and Layout Considerations
Consider how you want to use the basement space. Map out areas for recreation, storage, or additional bedrooms.
Plan your layout for functionality and aesthetics
Creating a basement that balances functionality and aesthetics starts with accurate measurements and thoughtful space evaluation. Assess ceiling heights to ensure comfort, keeping sections open where possible.
Think about the flow of the layout; for instance, place high-traffic areas like living spaces away from utilities such as heaters or HVAC systems for smoother transitions. Smart storage solutions like built-in shelving and custom cabinetry keep clutter at bay while maintaining a clean look.
“A well-planned design maximizes every square foot,” says Jane Smith, an interior design expert.
Incorporate separate zones for different activities to enhance usability, such as partition walls creating distinct spaces for entertainment or work. Use elements from Total Basement Finishing’s product line known for their quality and beauty to upgrade your base materials.
Opting for 3D software renderings in your planning phase can bring your vision to life before construction begins, making adjustments easier.
Consider adding egress windows for safety and natural light
Egress windows provide crucial safety benefits for basement living spaces. These windows offer an emergency exit route, essential for occupants and allowing firefighters easy access in case of emergencies.
Installing egress windows can also boost your home’s value by $10,000 to $20,000. Proper planning involves considering the window’s location and available installation space.
Natural light transforms a dark basement into a more inviting area. Egress windows allow sunlight to pour in, creating a brighter environment that reduces reliance on artificial lighting.
Choose designs that maximize both aesthetic appeal and ventilation needs to ensure comfort all year round while enhancing overall air quality levels in your finished basement space.
Choosing Materials for Basement Finishing
Selecting the right materials for basement finishing requires careful consideration. Choose products that offer durability, especially in damp environments.
Select moisture-resistant materials
Choose moisture-resistant framing materials, such as metal studs or treated lumber. These options help prevent mold and water damage. For insulation, opt for extruded polystyrene foam or spray foam to create a moisture barrier.
Products like Basement-to-Beautiful Wall Panels and ThermalDry Flooring offer durability, aesthetics, and low maintenance.
EverLast™ Wall Panels come with a 50-year warranty and provide excellent insulation along with a radiant barrier. Use the SaniDry dehumidifier to maintain lower humidity levels in your basement, preventing dampness issues effectively.
Options for walls, floors, and ceilings
For the walls, consider using products like EverLast Wall restoration systems, which allow you to replace only damp or damaged sections. Basement Systems offers stain- and mold-resistant wall panels that are perfect for wet environments.
ThermalDry Flooring options provide waterproof solutions with great insulation properties. You can choose from concrete, linoleum, ceramic tile, engineered wood, cork, and carpet for your floor.
Ceiling choices include drop ceilings and no-sag ceiling tiles designed especially for basements by Total Basement Finishing. These ceiling options improve aesthetics and add functionality by hiding ductwork and pipes while providing easy access when needed.
Installation Techniques and Tips
Insulate walls with fiberglass batts to improve energy efficiency. Use drywall mud to ensure smooth, even surfaces before painting.
Insulate and frame walls properly
Properly insulating and framing walls in your basement is crucial for a successful renovation. These steps will guide you through the process to ensure lasting results:
- Inspect Foundation Walls
- Check for cracks, moisture, or water damage on the foundation walls. Repair any issues before proceeding with insulation.
- Apply Extruded Polystyrene Foam Insulation
- Attach 3/4-inch extruded polystyrene foam directly to the foundation walls. This type of insulation resists moisture and provides excellent thermal protection.
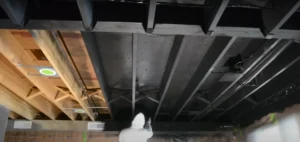
- Seal Rim Joists
- Use strips of extruded polystyrene foam to insulate the rim joists. Secure them tightly and seal all edges with spray foam to avoid air leaks.
- Frame Interior Walls
- Build a secondary wall using metal studs or treated lumber, keeping it at least half an inch away from the insulated foundation wall to prevent moisture transfer.
- Install Fiberglass Batts
- Place fiberglass batts between the studs within the framed interior walls for additional insulation. Ensure they fit snugly without gaps or compressions.
- Vapor Barrier Installation
- Staple a vapor barrier over the framed wall’s inner side facing the living space to protect against mold and mildew caused by trapped moisture.
- Add Drywall Panels
- Measure and cut gypsum drywall panels to fit between wall studs precisely. Secure them using drywall screws, ensuring panels cover all areas uniformly.
- Tape and Mud Joints
- Apply drywall tape along seams where panels meet and cover these joints with drywall mud for a smooth finish, ready for painting or wallpapering later.
- Inspect Electrical Wiring & Plumbing Configuration
- Before finalizing drywall installation, ensure all wiring and plumbing configurations are properly installed in line with local building codes for safety and functionality.
- Install Subfloors if Necessary
- Depending on your basement’s layout planning, install subflooring that can provide added warmth and comfort underfoot while helping manage potential dampness from below.
Install flooring and ceiling solutions
Installing flooring and ceiling solutions in your basement can transform it into a cozy, functional space. Use these steps to guide you through the process.
- Start with Ceiling Panels
- Secure ceiling panels before wall panels. This method supports the edges of the ceiling panels.
- Consider using Total Basement Finishing’s no-sag ceilings designed for basements.
- Choose Moisture-Resistant Flooring
- Opt for ThermalDry Flooring, which resists moisture, mold, and mildew. This will help keep your basement dry and safe from water damage.
- ThermalDry Floor Matting can provide additional insulation and comfort underfoot.
- Install Insulated Subflooring
- Use ThermalDry Insulated Subfloor to create a barrier between cold concrete floors and your finished flooring material. This helps maintain warmth.
- Select Durable Materials for Ceilings
- Choose materials like gypsum panels or wallboard that withstand moisture better than regular drywalling options.
- Ensure these materials are also sound-dampening to reduce noise from above.
- Use Proper Fastening Techniques
- Secure floor joists firmly when installing ceiling materials to avoid sagging or warping.
- Follow manufacturer instructions carefully for best results.
- Incorporate Soundproofing Solutions
- Include soundproofing elements to enhance privacy, especially in multi-purpose spaces like home theaters or guest rooms.
- Assess Critical Areas During Installation
- Inspect air ducts and other critical areas during installation to ensure they are not compromised by new construction.
Transforming your basement can be an exciting project with lasting benefits for your home’s value and functionality.
Enhancing Your Basement
Install soundproofing materials to create a quiet and peaceful environment. Design versatile spaces that can serve multiple purposes depending on your needs.
Incorporate soundproofing for privacy
Adding soundproofing to your basement creates a peaceful living space and provides much-needed privacy. Soundproofing walls and ceilings is crucial for reducing noise disturbances.
Effective soundproofing materials include fiberglass insulation, resilient channels, and acoustic panels. These options help block airborne noises from traveling between rooms.
Consider installing soundproof flooring solutions to minimize impact noise from footsteps or dropped objects. Options like thick carpets with padded underlays or specialized rubber mats can significantly reduce these sounds.
Prioritizing proper material selection ensures that your basement remains a quiet retreat, even when the rest of the house is bustling.
Basement Systems offers various soundproofing solutions suited for different needs. Placing foam panels behind drywall and adding sealants around door frames further enhances privacy by stopping sound leakage through small gaps and cracks.
With these measures in place, you create an optimal environment free from unwanted interruptions.
Design multipurpose spaces for flexibility
Designing a multipurpose basement can significantly boost your home’s value by up to 70%. Popular uses for these adaptable spaces include game rooms, wine cellars, libraries, workshops, and home gyms.
These areas must balance functionality with aesthetics. Consider how storage needs, lighting, and electrical requirements will impact each potential use of the space.
Use accurate measurements and comprehensive evaluations during planning phases. Free design consultations offer no-obligation advice and can even provide 3D software renderings of your remodeled basement.
Total Basement Finishing’s products ensure beauty, quality, and durability for any purpose you choose to implement in this flexible area.
Conclusion
Finishing your basement opens up new possibilities for your home. With the right planning and materials, you can create a functional and beautiful space. Don’t forget to address moisture issues first to ensure lasting results.
By following these steps, you’ll transform your basement into a room everyone loves.
FAQs
1. How do I deal with water-damaged areas in my basement?
First, identify the source of the water damage and fix it. Remove any damaged materials and replace them with water-resistant options to prevent future issues.
2. What safety equipment should I use while finishing my basement?
Use proper safety gear like goggles, gloves, and masks. Consult a professional for advice on additional necessary precautions.
3. Can hot-water systems be installed in a finished basement?
Yes, but make sure they are properly insulated to avoid leaks or damage from potential flooding.
4. Are there specific products recommended for making a basement more water resistant?
Look for waterproof paints, sealants, and flooring options designed specifically for basements to enhance their resistance against moisture.