Is your basement a dark, damp space that’s begging for a makeover? Many homeowners dream of turning their unfinished basements into cozy living areas but don’t know where to start.
Finishing a basement can seem like a huge task, especially if you’re planning to do it yourself.
Did you know that a finished basement can add up to 70% return on investment to your home’s value? That’s a great reason to tackle this project. This guide will walk you through how to finish a basement the right way.
We’ll cover everything from prep work to final touches, giving you the know-how to create your dream space. Ready to transform your basement? Let’s get started.
Key Takeaways
- A finished basement can add up to 70% return on investment to your home’s value.
- Moisture tests help spot water issues before starting work. Basic DIY tests use plastic sheeting, while professional tests cost $250-$600.
- Most experts suggest using insulation with an R-value of at least R-10 for basement walls.
- 57% of basement projects use carpet or laminate flooring options.
- Egress windows are required for safety and cost $2,500-$5,000 per window to install.
Preparing for Your Basement Renovation
Preparing your basement for renovation starts with a clean slate. Clear out all items and perform a moisture test to spot potential water issues before you begin work.

Clearing out the basement
Clearing out the basement marks the first step in your renovation journey. This task sets the stage for a smooth and efficient project.
- Rent a roll-off dumpster: Costs range from $268 to $766 based on size. This makes debris disposal easy and keeps your work area clean.
- Sort items: Group things into keep, donate, sell, and trash piles. This helps you decide what stays and what goes.
- Remove large furniture: Take out bulky items like sofas, tables, and shelves. This creates space for your renovation work.
- Pack and label boxes: Use sturdy containers for items you plan to keep. Label each box clearly for easy unpacking later.
- Clean thoroughly: Sweep, vacuum, and mop the floor. Wipe down walls and surfaces to remove dust and cobwebs.
- Check for hazards: Look for exposed wires, leaky pipes, or mold growth. Address these issues before starting your project.
- Seal off vents: Cover air ducts with plastic sheets. This prevents dust from spreading to other parts of your house during renovation.
- Set up a staging area: Choose a spot near the basement entrance for tools and materials. This keeps your work zone organized.
- Take “before” photos: Snap pictures of your empty basement. These will help you track progress and serve as a reference point.
- Plan your layout: With the space cleared, you can now visualize and mark areas for different features of your new basement.
Performing a moisture test
Before starting your basement renovation, a moisture test is essential. This simple step can save you time and money in the long run. Moisture tests help identify potential water issues that could damage your hard work.
You can perform a basic moisture test at home. Tape a small piece of plastic sheeting to your basement floor and walls. Leave it for 24 hours. If you see condensation under the plastic, you have a moisture problem.
For more accurate results, use a moisture meter. These tools measure the amount of water in materials like concrete and wood.
A dry basement is the foundation of a successful renovation.
Professional moisture tests cost between $250 and $600. They’re worth the investment if you’re unsure about your DIY results. Experts can pinpoint the source of moisture and suggest fixes.
Addressing dampness is key to a long-lasting basement finish.
Reviewing local building codes and permits
Local building codes and permits play a crucial role in basement renovations. Checking these rules helps ensure your project meets safety standards and avoids legal issues.
- Research local building codes:
- Find your area’s specific rules for basement finishing
- Look for guidelines on ceiling height, egress windows, and fire safety
- Check requirements for electrical, plumbing, and HVAC systems
- Obtain necessary permits:
- Visit your local building department or city hall
- Ask about permit requirements for basement renovations
- Fill out and submit all required paperwork
- Schedule inspections:
- Plan for inspections at key stages of your project
- Arrange for final inspection upon completion
- Keep all inspection reports for future reference
- Hire licensed professionals:
- Use certified electricians and plumbers for specialized work
- Ensure contractors are familiar with local codes
- Ask for proof of licenses and insurance
- Follow zoning regulations:
- Check if your basement can be used as living space
- Verify rules on adding bedrooms or bathrooms
- Understand limits on home occupancy
- Address safety concerns:
- Install smoke and carbon monoxide detectors
- Ensure proper ventilation and air quality
- Plan for emergency exits and fire-resistant materials
- Consider energy efficiency:
- Review insulation requirements for basement walls and floors
- Check rules on energy-efficient windows and doors
- Learn about HVAC system standards for basements
- Document everything:
- Keep copies of all permits, plans, and approvals
- Take photos of work in progress
- Save receipts for materials and labor
Key Steps in Basement Finishing
Finishing your basement starts with key steps. These steps include tackling moisture issues, adding insulation, and setting up walls.

Address dampness issues
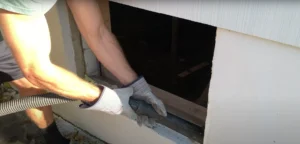
Tackling dampness is crucial before starting your basement renovation. Moisture can ruin your hard work and create health risks. Start by finding the source of dampness. Look for cracks in walls or floors, and check for leaky pipes or poor drainage outside.
Fix any issues you find right away. Use waterproof coatings on walls and floors to block moisture. Install a good drainage system, including a sump pump if needed. Make sure gutters and downspouts direct water away from your home’s foundation.
A dry basement is the foundation of a successful renovation.
Proper ventilation helps too. Install dehumidifiers to control moisture levels. Consider adding exhaust fans in bathrooms or laundry areas. These steps will create a dry, healthy space for your new basement.
Insulate the basement walls
Insulating basement walls is a key step in finishing your basement. Start by measuring the wall height and width. Cut foam insulation boards to fit these measurements. Next, apply insulation adhesive to the back of each board.
Press the boards firmly against the wall, starting at a corner. Make sure to leave no gaps between boards.
Fill any seams or gaps with caulk using a caulk gun. This stops air and moisture from getting behind the insulation. For the best results, use foam insulation with a high R-value. R-value measures how well insulation blocks heat flow.
Higher R-values mean better insulation. Most experts suggest using insulation with an R-value of at least R-10 for basement walls.
Good insulation helps keep your basement warm and dry. It also cuts down on energy costs for your whole house. With the right tools and care, you can insulate your basement walls yourself.
Just be sure to follow local building codes and safety rules as you work.
Construct wall frames
Building wall frames is a key step in finishing your basement. This task requires careful planning and precise execution. Here’s how to construct wall frames:
- Draw a floor line: Use a chalk line to mark where your walls will go on the concrete floor.
- Cut 2x4s: Measure and cut top and bottom plates to fit your planned wall layout.
- Mark stud placements: On the plates, mark spots for studs every 16 inches.
- Secure bottom plate: Fasten the bottom plate to the floor with a masonry drill and concrete screws.
- Install studs: Cut studs to fit between plates and nail them in place at marked spots.
- Add top plate: Attach the top plate to the studs, making sure it’s level.
- Check for level: Use shims if needed to ensure your frame is perfectly straight.
- Frame openings: Create rough openings for doors and windows as needed.
- Build soffits: Frame any soffits to hide pipes or ductwork.
- Add blocking: Install blocking between studs for extra support where needed.
- Frame partition walls: Build interior walls using the same method as exterior ones.
- Double-check measurements: Ensure all framing is square and plumb before moving on.
Setup electrical and plumbing systems
Electrical and plumbing systems form the backbone of a functional basement. These vital components need careful planning and expert installation to ensure safety and efficiency.
- Plan your layout: Sketch a detailed floor plan showing where you want outlets, lights, sinks, and toilets.
- Check local codes: Review building codes to understand requirements for electrical and plumbing work in basements.
- Hire professionals: Certified electricians and plumbers should handle these complex systems for safety and code compliance.
- Install electrical wiring: Run wires through wall studs and ceiling joists before closing up walls.
- Set up circuit breaker panel: Install a separate panel for basement circuits if needed.
- Place outlets: Add outlets every 6 feet along walls and near work areas.
- Install lighting: Choose recessed lights for low ceilings or pendant lights for higher ones.
- Run plumbing pipes: Connect new pipes to existing water supply and drain lines.
- Install shut-off valves: Place easily accessible valves for each plumbing fixture.
- Waterproof connections: Use proper sealing methods to prevent leaks in damp basement conditions.
- Test systems: Check all electrical and plumbing installations before closing up walls.
- Leave access points: Create removable panels for future repairs or upgrades to utility lines.
Implementing the Finishing Touches
Finishing touches bring your basement to life. Drywall, paint, flooring, and ceiling choices transform the space from bare to beautiful.
Install and finish drywall
Installing and finishing drywall marks a key step in your basement renovation. This process transforms bare walls into smooth surfaces ready for paint or wallpaper.
- Measure and cut drywall sheets to fit your walls.
- Mark spots for electrical outlets and other utilities on the drywall.
- Secure drywall to wall studs using a nail gun or drywall screws.
- Apply joint compound to seams and screw holes with a putty knife.
- Place drywall tape over seams and embed it in the wet compound.
- Let the first coat dry, then add two more thin coats of joint compound.
- Sand the dried compound smoothly with fine-grit sandpaper.
- Wipe away dust with a damp cloth.
- Prime the walls to prepare for painting.
- Paint the walls in your chosen color using a roller for large areas and a brush for edges.
Paint walls and trim
Painting walls and trim adds the final touch to your basement renovation. A fresh coat of paint can brighten the space and make it feel more like home.
- Choose the right paint: Pick a moisture-resistant paint made for basements. This type of paint helps prevent mold and mildew growth.
- Prep the walls: Clean the walls with a damp cloth to remove dust. Fill any holes or cracks with spackle and sand smooth once dry.
- Prime the walls: Apply a coat of primer to help the paint stick better and cover any dark spots.
- Paint the ceiling first: Use a roller with an extension pole to reach high spots. Start in a corner and work your way across the room.
- Paint the walls: Cut in around the edges with a brush, then use a roller for large areas. Apply two coats for best coverage.
- Let each coat dry: Wait at least two hours between coats. Good airflow helps speed up drying time.
- Paint the trim: Use painter’s tape to protect walls. Apply paint with a small brush for a neat finish.
- Remove tape: Peel off the tape while paint is still slightly wet to avoid peeling dried paint.
- Touch up: Check for any missed spots or drips. Fix these areas with a small brush.
- Clean up: Wash brushes and rollers with soap and water. Store leftover paint in a cool, dry place.
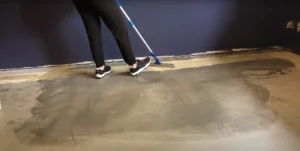
Lay down flooring
Flooring brings life to your basement. Choose from carpet or laminate, as 57% of projects use these options.
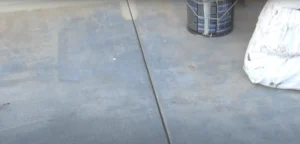
- Clean and level the subfloor
- Install a moisture barrier
- Lay down insulation boards
- Place plywood sheets over insulation
- Secure plywood with screws
- Apply adhesive for laminate or carpet padding
- Install laminate planks or roll out carpet
- Trim edges and add baseboards
- Seal seams for water protection
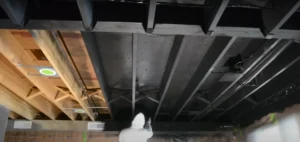
Choose between drop ceiling and drywall ceiling
Choosing between a drop ceiling and drywall ceiling is a key step in basement renovation. Drop ceilings offer easy access to pipes and wires above. You can buy a kit with frames and snap-in tiles for quick setup.
This option works well if you need to reach utilities often.
Drywall ceilings give a smooth, finished look. To install, cut holes for lights and vents. Then, apply glue and press the drywall against the joists. Secure it with fasteners, fill seams and paint.
This choice is best for basements with high ceilings or where a polished look matters most.
Both options have pros and cons. Drop ceilings cost less and install faster. Drywall ceilings last longer and resist moisture better. Your choice depends on your budget, skills, and basement needs.
Consider factors like ceiling height and how often you’ll need to access the space above.
Special Features in Basement Renovation
Special features can make your basement stand out. Add egress windows for safety and light. Check radon levels to keep the air healthy. Plan smart heating and air flow systems. Read on to learn more about these key upgrades.
Install egress windows
Egress windows are a must for basement safety. They provide an escape route in emergencies and let in natural light. Building codes often require these windows in finished basements.
Homeowners should plan for the cost and installation process. Proper sizing and placement are key to meeting safety standards.
Installing egress windows involves cutting through foundation walls. This job needs special tools and skills. Many people hire pros for this task. The average cost ranges from $2,500 to $5,000 per window.
Factors like window type, soil conditions, and local rules affect the price. Despite the cost, egress windows add value and peace of mind to your home.
Mitigate radon levels
Radon poses a serious health risk in basements. This colorless, odorless gas can seep through cracks in your foundation. To protect your family, test your basement for radon levels.
If levels are high, install a radon mitigation system. This system uses pipes and fans to draw radon from under your home and vent it outside. The EPA recommends keeping indoor radon levels below 4 pCi/L for safety.
Professional installation of a radon mitigation system costs about $1,200 on average. DIY kits are available but may not be as effective. Regular testing after system installation ensures it works properly.
Sealing cracks in your basement floor and walls also helps reduce radon entry. Addressing radon is a crucial step in creating a safe, finished basement space.
Design heating and ventilation systems
Proper heating and ventilation are key to a cozy basement. A well-designed system keeps your space comfortable and meets local codes.
- Assess your needs: Figure out the size of your basement and how you’ll use it. This helps decide the right heating and cooling power.
- Choose a heating method: Options include extending your home’s HVAC, using a ductless mini-split, or installing baseboard heaters.
- Plan for air circulation: Add return air vents to move air back to your furnace. This keeps air fresh and reduces moisture.
- Install a dehumidifier: Basements often trap moisture. A dehumidifier helps prevent mold and keeps the air dry.
- Consider radiant floor heating: This system warms your floor, making the whole room cozy. It works well with concrete floors.
- Add insulation: Good insulation helps your heating system work better. Use foam board on walls and fiberglass in ceiling joists.
- Seal air leaks: Check for gaps around windows, pipes, and wires. Seal them to stop drafts and save energy.
- Install carbon monoxide detectors: These are must-haves for safety, especially with gas-powered heating systems.
- Plan ductwork carefully: If extending your HVAC, map out duct routes to avoid beams and pipes.
- Think about zoning: Create separate heating zones for better control and energy savings.
Handy DIY Tips for Basement Renovation
DIY basement renovations need the right tools and know-how. Smart planning and cost-saving methods can make your project a success.
List tools and materials needed
Basement renovation requires the right tools and materials. Here’s a list of essentials you’ll need for your DIY project:
Tools:
- Caulk gun: Seals gaps and cracks in walls and floors
- Circular saw: Cuts wood for framing and other tasks
- Hammer: Drives nails and removes old fixtures
- Insulation adhesive: Secures foam board to walls
- Ladder: Reaches high spots for ceiling work
- Nailgun: Speeds up framing and trim installation
- Tape measure: Ensures accurate measurements
- Utility knife: Cuts insulation and drywall
Materials:
- Foamboard adhesive: Bonds insulation to concrete walls
- Caulk: Fills small gaps and cracks
- Framing nails: Secures wood frames
- Ceiling tiles: Creates a finished look overhead
- Shims: Levels uneven surfaces
- Polystyrene foam insulation: Insulates walls and ceilings
- Two-by-four boards: Builds wall frames
- Wall screws: Attaches drywall to frames
- Flooring: Covers concrete floors
- Plywood: Provides a base for flooring
- Duct tape: Seals joints in ductwork
- Cement nails: Anchors frames to concrete floors
- Drywall: Covers framed walls
- Wire: Runs electrical circuits
- Wire cutters: Trims electrical wires
Plan a budget and explore cost-saving methods
Planning a budget for your basement renovation is crucial. You can save money with smart choices and careful planning. Here’s how to plan your budget and cut costs:
- Set a realistic budget: Decide how much you can spend. The average cost to finish a basement ranges from $25 to $50 per square foot.
- Get multiple quotes: Ask at least three contractors for estimates. Compare prices and services to find the best deal.
- Do some work yourself: Save on labor costs by taking on simple tasks like painting or installing baseboards.
- Use cost-effective materials: Choose budget-friendly options for flooring, walls, and ceilings without sacrificing quality.
- Shop sales and clearance: Look for discounts on materials and fixtures at home improvement stores.
- Reuse or repurpose items: Give new life to old furniture or fixtures you already own.
- Focus on essential upgrades: Prioritize necessary improvements over luxury features.
- Plan for unexpected costs: Set aside 10-20% of your budget for surprises that may pop up during renovation.
- Consider energy-efficient options: Invest in insulation and LED lighting to save on future energy bills.
- Hire professionals for complex work: Leave electrical, plumbing, and structural changes to experts to avoid costly mistakes.
Conclusion
Completing your basement renovation enhances your home’s value and expands its usable space. With the proper equipment and knowledge, you can undertake this project on your own. Careful planning, addressing moisture concerns, and adhering to local regulations are essential.
Proceed methodically through each phase, from framing to flooring installation. Your diligent efforts will result in a comfortable new living area. Enjoy your newly renovated basement!
FAQs
Here are 6 FAQs about DIY basement renovation:
1. What are the first steps to finish a basement?
Start by checking for water issues and fixing them. Next, plan your layout. Then, frame the walls and install insulation. Make sure to use pressure-treated wood for the bottom plate touching the concrete floor.
2. How do I waterproof my basement before renovating?
Install a drain tile system around the foundation. Apply waterproof sealant to walls and floors. Fix any cracks in the concrete. Ensure proper grading outside to direct water away from your home.
3. What type of insulation is best for basement walls and ceilings?
Fiberglass batts or rigid foam insulation work well. Choose insulation with a high R-value for better energy savings. Don’t forget to insulate rim joists and the space between floor joists.
4. Should I hang drywall vertically or horizontally in my basement?
Hang drywall horizontally for walls under 9 feet. This creates fewer seams and is easier to finish. Use drywall screws to secure panels. Leave a small gap at the bottom to prevent moisture damage.
5. What flooring options work best for a basement?
Vinyl composition tiles, engineered wood, or carpet tiles are good choices. They resist moisture and are easy to install. Avoid solid hardwood, which can warp in damp conditions.
6. Do I need permits for a DIY basement renovation?
Most areas require permits for major changes like adding rooms or altering plumbing and electrical systems. Check with your local building department before starting your project to avoid fines or having to redo work.