Finishing a basement floor can be challenging, especially if you’re facing issues like moisture, uneven surfaces, or simply not knowing where to start. Many homeowners struggle with transforming their dark, damp cellar into a functional and beautiful space.
But don’t worry; you’re not alone.
Did you know that concrete is one of the most popular materials for basement floors because it’s durable and easy to maintain? This guide on “How To Finish A Basement Floor” will walk you through everything from preparing your space to selecting the right flooring option.
By following this comprehensive guide, you’ll learn how to tackle common problems and achieve professional results without breaking the bank. Ready to transform your basement? Read on!
Key Takeaways
- Address Moisture and Level Surfaces: Handle moisture issues by using damp proofing or waterproofing, sealing cracks with epoxy, and installing a vapor barrier. Use self-leveling compound to create an even surface for smooth flooring installation.
- Epoxy Coatings for Durability: Epoxy coatings provide durable, moisture-resistant surfaces that are easy to maintain. They involve applying multiple coats with drying times between layers.
- Versatile Flooring Options: Choose from various materials like vinyl, ceramic tile, or concrete stain based on your budget and preferences. Each offers unique benefits like ease of maintenance or visual appeal.
- Proper Insulation Matters: Select suitable insulation such as spray foam or fiberglass to keep the basement warm and reduce energy costs. Properly applied insulation also helps control indoor humidity levels.
- Routine Maintenance Extends Lifespan: Regular sweeping, immediate spill clean-up, avoiding harsh chemicals, and ensuring proper ventilation are essential practices to prolong the life of basement floors. Address any damage promptly for best results.
Preparing Your Basement Floor
Start by addressing any moisture or humidity issues in the basement. Next, ensure the floor surface is level for a smooth installation process.
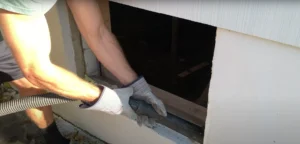
Address Moisture and Humidity Issues
Moisture and humidity issues can severely damage your basement floor. Start by investing in damp proofing for $3 to $6 per square foot or waterproofing, which costs between $5 and $10 per square foot.
Install a portable dehumidifier for around $200 to maintain recommended relative humidity (RH) levels of 30% to 60%. This helps prevent mold growth and maintains indoor air quality.
Seal cracks in the walls and floors with epoxy coating or waterproof paint primer. Apply foam insulation on walls to reduce moisture seepage from outside. Consider installing a vapor barrier under any subfloor you lay down, especially if using materials like engineered hardwood or laminated wood flooring.
These steps ensure your renovated basement remains dry and comfortable year-round.
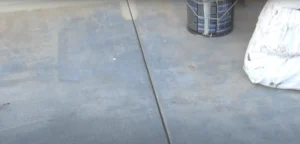
Level the Floor Surfaces
Use a self-leveling compound to make an uneven basement floor smooth. Before applying, clean the concrete thoroughly and fill cracks with elastomeric sealant, which costs $4 to $10.
Mix the compound according to the package instructions. Pour it over low areas and spread it with a trowel or squeegee.
Renting a concrete sander can help eliminate high spots on your basement floor. This tool typically costs about $172 per day. Sand any ridges or bumps until they are level with surrounding areas.
Laying down tile backerboard as a subfloor adds stability and moisture resistance for around $1 per square foot, totaling about $6 per square foot when installation materials are considered.
A flat surface is essential if you want your flooring to last, says home renovation expert Lisa Gordon.
Prepare evenly leveled surfaces before installing flooring options like vinyl tiles or hardwood floors in basements for better results and prolonged durability of your chosen material.
Flooring Options for Basements
Different materials can make your basement more functional and visually appealing. Choose the type that best suits your needs and budget, from practical solutions to stylish upgrades.
Epoxy Coatings
Epoxy coatings offer a durable and moisture-resistant solution for basement floors. This type of flooring costs about triple the price of paint or concrete stain but covers four times the area, providing excellent long-term value.
Applying epoxy requires multiple coats with drying times ranging from 12 to 48 hours between each layer. It forms a tough, glossy finish that looks attractive and stands up well against water damage.
Maintenance is easy with epoxy-coated floors since they resist stains and dirt buildup. Use basic cleaning tools like mops and gentle detergents to keep your floor looking new. This makes it an ideal choice for families wanting low-maintenance solutions while upgrading their basement space.
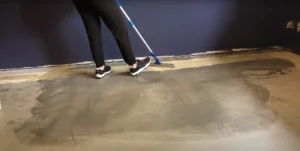
Paint
Painting your basement floor can be an affordable and effective way to enhance its look. Two-part epoxy paint stands out for its durability and chemical resistance. This type of paint can last 10 to 20 years, making it a long-term solution for high-traffic areas like basements.
Start by cleaning the floor thoroughly. Remove all stains, dirt, and debris to ensure the paint adheres well. Apply a primer if needed. Then mix and apply the two-part epoxy according to the manufacturer’s instructions.
Ensure even coverage with a roller or brush.
“A fresh coat of paint transforms spaces effortlessly.”
Concrete Stain
Concrete stain offers a stylish and durable flooring solution for basements. Available at costs ranging from $7 to $25 per square foot, it’s an affordable way to enhance the space’s appeal.
This versatile option can mimic marble, tile, or wood finishes. To ensure longevity, sealing the stained concrete is essential, as it protects against minimal moisture interference.
Efflorescence can occur if the concrete is exposed to excessive moisture. The sealant helps mitigate this issue by providing a barrier against dampness. Concrete stains come in various colors and offer unique patterns that elevate your basement’s aesthetic without needing expensive materials like hardwood flooring or ceramic tiles.
Ceramic Tile
Ceramic tile offers a durable and water-resistant option for basement flooring. It comes in various styles, colors, and finishes, allowing homeowners to match their decor seamlessly.
The cost of ceramic tiles ranges from $1 to $30 per square foot for materials, making it a versatile choice for different budgets. Professional installation might cost around $3,500 for 200 square feet.
Installing ceramic tile involves placing a moisture barrier first to prevent seepage issues common in basements. Next, apply thin-set mortar and lay the tiles carefully on the leveled floor surface.
Grout the spaces between tiles once they set properly. This method ensures maximum durability and enhanced appearance while maintaining resistance against water damage.
Vinyl Flooring
Vinyl flooring stands out as a top choice for basement renovations due to its durability and affordability. Costs range from $1 to $3 per square foot for materials, making it a budget-friendly option.
Professional installation adds another $1 to $2 per square foot. This type of flooring is moisture-proof and maintenance-free, ideal for basements prone to dampness.
Sheet vinyl comes in 12-foot-wide rolls and can cover large areas with minimal seams, which helps prevent water infiltration. Self-sticking vinyl tiles offer easy DIY installation and design flexibility.
Both types resist scratches and stains while delivering an attractive look that enhances your basement’s overall appearance.
Step-by-Step Guide to Installing Basement Flooring
Choose the right insulation materials like spray foam or fiberglass for a warm, dry space. Use a nail gun to secure your chosen flooring material firmly in place.
Install the Chosen Flooring Material
Cut the flooring material to fit your basement layout. Use a utility knife for vinyl or laminate, and a tile cutter for ceramic tiles. Apply adhesive evenly on the subfloor before placing each piece.
Ensure alignment by using spacers if installing tile, which will keep them uniformly spaced.
Press down firmly on each section of floor material to secure it in place. For floating floors like laminate, click the pieces together without glue. For carpet, stretch it over tack strips along the edges of the room to keep it tight.
Add Finishing Touches
Start with installing baseboards to give the floor a polished look. Use polyurethane to seal and protect wood elements, which boosts durability and keeps it looking fresh. For added insulation, consider wool insulation around the perimeter.
Install handrails if you have stairways leading down to ensure safety.
Next, add area rugs or cork flooring for extra warmth and comfort underfoot. Arrange furniture like sofas or gaming tables to make the space inviting. Keep hygiene in mind by using materials that are easy to clean, helping maintain a healthy environment.
Finally, use recessed lighting for better natural light distribution without taking up headspace.
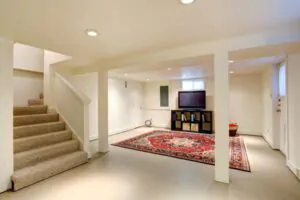
Benefits of Properly Finished Basement Floors
A professionally finished basement floor transforms your space into a versatile living area. It creates a clean, attractive environment perfect for entertaining or additional family activities.
Increased Market Value
Upgrading your basement floor can significantly boost your home’s market value. Adding livable space to your home makes it more appealing to potential buyers, who often look for houses with extra usable areas.
A well-finished basement also provides a higher return on investment compared to unfinished ones.
Opting for quality materials like Penntek polyurea coatings can further enhance the market value of your property. These coatings offer durability and a sleek finish that attracts buyers looking for low-maintenance flooring options.
Moreover, they are known to withstand moisture better than traditional options, which is crucial in basements prone to dampness.
Improved Appearance and Utility
A well-finished basement floor significantly boosts both the appearance and utility of your home. High-quality materials like ceramic tile or vinyl flooring make the space feel polished and inviting, transforming it into a potential living area or entertainment room.
Epoxy coatings and concrete stains offer sleek surfaces that are easy to clean, making maintenance simple. Enhancements like these increase aesthetic appeal and offer practical benefits such as easier upkeep.
Installing proper insulation underneath the flooring material can drastically improve energy efficiency. Options like spray foam insulation help maintain temperature control, contributing to heating and cooling cost savings.
Adding a radiant barrier beneath tiles or vinyl can further enhance energy conservation by reflecting heat back into the room during winter months. This ensures comfort while reducing overall energy consumption in your HVAC system year-round.
Mitigation of Moisture Problems
Properly addressing moisture problems in your basement is crucial. Start by eliminating excessive internal moisture sources, like leaky pipes or poor ventilation. Install an active sub-slab depressurization system to reduce radon and other soil gases.
Lay a wash-rock layer below the slab for better drainage and to prevent water buildup.
Using materials such as fiberglass insulation with a high R-value can help manage humidity levels effectively. Applying a vapor barrier on walls and floors adds an extra layer of protection against dampness.
Ensure that all cracks are sealed tightly with caulk or concrete filler to block any potential water entry points.
Maintenance Tips for Basement Floors
Regular cleaning extends the life of your basement floor.
Routine Cleaning Recommendations
Routine cleaning keeps your basement floor looking great and helps maintain its durability. Follow these steps to ensure a clean and long-lasting floor:
- Sweep or Vacuum Regularly:
- Use a broom or vacuum cleaner to remove dust, dirt, and debris.
- Ensure you reach corners and edges where dirt can accumulate.
- Wipe Up Spills Immediately:
- Use a damp cloth to clean spills as soon as they happen.
- This prevents staining and reduces the risk of moisture damage.
- Avoid Harsh Chemicals:
- Opt for mild detergent mixed with water when mopping the floor.
- Harsh chemicals can damage the flooring material over time.
- Use Soft Cleaning Tools:
- Choose soft-bristled brooms or microfiber mops.
- Avoid abrasive tools that can scratch or wear down the surface.
- Ensure Proper Ventilation:
- Open windows or use fans to keep air circulating.
- Good ventilation helps prevent mold growth and keeps humidity levels in check.
- Check for Moisture Signs:
- Inspect regularly for any signs of water seepage or dampness.
- Address any moisture issues promptly to protect your flooring.
- Handle Stains Promptly:
- Treat stains with appropriate cleaners recommended for your flooring type.
- Blot rather than scrub to avoid spreading the stain further.
- Schedule Routine Inspections:
- Check the floor every few months for any wear and tear.
- Replace or repair any damaged sections immediately to maintain overall integrity.
- Limit Heavy Traffic Areas:
– Place rugs or mats in high-traffic areas like near stairs to reduce wear on these spots.
Following these routine cleaning practices will sustain the beauty and functionality of your basement floor for years to come.
Handling Stains and Damage
Stains and damage on basement floors are common issues. Follow these steps to handle them effectively:
- Identify the Stain Type:
- Determine if the stain is from moisture, rust, or organic material.
- Knowing the type helps choose the right cleaning method.
- Use Appropriate Cleaners:
- For moisture stains, use a mixture of water and mild detergent.
- Rust can be tackled with a paste of baking soda and water.
- Organic stains, like mold, respond well to white vinegar.
- Scrub the Affected Area:
- Apply the chosen cleaner to the stain.
- Use a stiff brush to scrub in circular motions.
- Rinse Thoroughly:
- Remove all cleaning residue by rinsing with clean water.
- Ensure no soap remains as it attracts more dirt.
- Dry Completely:
- Use fans or dehumidifiers to dry the area quickly.
- Prevents new mold growth due to dampness.
- Repair Minor Damage:
- Small cracks can be filled with concrete patching compound.
- Smooth out using a trowel for even surfaces.
- Seal Cracks and Gaps:
- Larger gaps need a waterproof sealant.
- Ensures no water seeps through and causes further damage.
- Consider Professional Help for Severe Issues:
- Significant structural damage might need an expert.
- Protects your investment and ensures long-term stability.
- Regular Inspections:
- Regularly check for new stains or damage signs.
- Early detection simplifies repair efforts and costs less.
Conclusion
Transforming your basement floor can elevate the entire space. By choosing durable materials and following clear steps, you can create a functional and stylish area. Whether it’s epoxy coatings or ceramic tile, each option offers unique advantages for a cozy, dry basement.
FAQs
1. What flooring options are best for a basement?
Laminate flooring, engineered wood, and glazed tile are popular choices. Each offers durability and style.
2. Why should I use a vapour barrier when finishing my basement floor?
A vapour barrier helps prevent moisture from damaging your floor tiles or laminate flooring, ensuring long-lasting results.
3. Can finishing my basement help with energy savings?
Yes! Using materials like polyisocyanurate insulation can reduce energy consumption by providing better sound insulation and temperature control.