Concrete floors in basements can be dull and uninviting, but applying floor paint can transform them. Many homeowners struggle with how to make these spaces more appealing and functional. “How To Finish Concrete Floors In Basement” is a common question for those looking to upgrade their lower level.
Finishing concrete basement floors offers many benefits. It can reduce trip hazards, control moisture, and improve the look of your space. This guide will walk you through the steps to transform your basement floor.
From choosing the right finish to application techniques, we’ve got you covered. Ready to give your basement a makeover?
Key Takeaways
- Prepare basement floors by checking for water issues and fixing cracks before finishing.
- Choose from finishes like epoxy coatings, concrete stains, or luxury vinyl planks based on your needs and budget.
- Clean, repair, and prime the floor surface before applying your chosen finish for best results.
- Consider moisture control and insulation when finishing your basement to protect your new floor.
- A well-finished basement floor can add value to your home and make the space more comfortable for years.
Preparing Your Basement Floor for Finishing
Preparing your basement floor is key to a successful finish. You need to check for water issues and assess the concrete’s condition before starting.
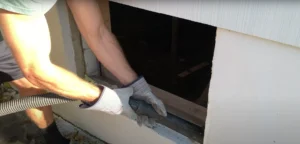
Check for Water Issues
Water issues can ruin your basement finishing plans. Before you start, check for moisture problems. A simple test involves taping a plastic sheet to the floor. Leave it for 24 hours.
If water droplets form under the sheet, you have a moisture issue.
Fixing water problems is key to a dry basement. Install a sump pump or French drain to move water away from your home. Seal cracks in the walls and floor. Use waterproof coatings on concrete surfaces.
These steps will help keep your basement dry and ready for finishing.
Evaluate Concrete Condition
Checking your concrete’s condition is key before finishing your basement floor. Look for cracks, chips, or uneven spots. These issues need fixing first. Small cracks can be filled with a concrete patching compound.
Larger problems may need expert help. A smooth surface is vital for a good finish. Test the concrete’s moisture level too. High moisture can ruin your new floor. Use a moisture meter or plastic sheet test to check.
If levels are high, address the cause before moving on. This step ensures your new floor lasts and looks great for years to come.
Choosing the Right Finish for Your Basement Floor
Picking the right finish for your basement floor is key. Your choice affects looks, durability, and cost.
Epoxy Coatings
Epoxy coatings offer a tough and shiny finish for concrete basement floors. These coatings come in many colors and can even mimic the look of granite or marble. They create a smooth surface that’s easy to clean and resists stains, chemicals, and water.
Homeowners often choose epoxy for its durability and low maintenance needs.
Epoxy coatings transform bare concrete into a showroom-worthy floor.
Penntek Polyurea coatings stand out as a top choice for quick installation and long-lasting results. These coatings dry fast, allowing you to use your basement soon after application.
They also offer many design options, letting you customize your floor’s look. With proper care, an epoxy-coated floor can last for years, making it a smart investment for your home.
Concrete Stain
Moving from epoxy coatings, another popular option for basement floors is concrete stain. This method offers a unique way to transform plain concrete into a beautiful surface. Concrete stains come in two types: acid-based and water-based.
Acid stains react with the concrete to create permanent, rich colors that mimic natural stone or wood. Water-based stains coat the surface and provide a wider range of color options.
Stained concrete floors offer design flexibility and low maintenance. They can replicate the look of marble, tile, or wood at a fraction of the cost. The staining process is simple and can be a DIY project for handy homeowners.
For best results, clean the floor thoroughly before applying the stain or floor paint. After staining, seal the floor to protect it from spills and wear. This finish works well in basements as it resists moisture and mold growth.
Application Techniques for a Professional Finish
Applying a professional finish to your basement floor requires skill and attention to detail. The right techniques can transform your space into a stunning and durable area.
Surface Preparation
Surface preparation is crucial for a successful concrete floor finish. Proper prep ensures better adhesion and a longer-lasting result.
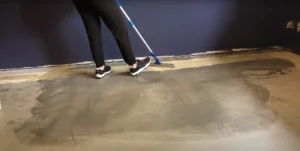
- Clean the floor: Remove all dirt, dust, and debris using a broom and vacuum. Mop the surface with a degreaser to remove oils or stains.
- Repair cracks and holes: Fill any cracks or holes with a concrete patching compound. Allow it to dry fully before moving on.
- Grind the surface: Use a concrete grinder to smooth out rough spots and create a uniform surface. This step helps the new finish bond better, ensuring a durable flooring option.
- Shot blast the floor: Shot blasting removes the top layer of concrete, creating a porous surface. This method improves adhesion for coatings and sealers.
- Hydroblast if needed: For tough stains or coatings, use high-pressure water to clean and prep the surface. This method is effective but can be messy.
- Test for moisture: Place plastic sheets on the floor and tape the edges. Check for condensation after 24 hours to ensure the concrete is dry enough.
- Apply a primer: Use a concrete primer to seal the surface and improve bonding. Choose a primer that matches your chosen finish.
- Let it cure: Allow the primer to dry fully before applying your chosen finish. Follow the manufacturer’s instructions for curing times.
Applying Your Chosen Finish
Applying your chosen finish is a key step in upgrading your basement floor. Follow these steps to get a pro-level result:
- Clean the surface well. Remove all dirt, dust, and debris with a broom and vacuum.
- Repair any cracks or holes. Use a concrete patching compound for small fixes.
- Apply a primer if needed. Some finishes require a primer for better adhesion.
- Mix your finish product. Follow the maker’s instructions for the right mix ratio.
- Apply the first coat. Use a roller or brush to spread the finish evenly.
- Let the first coat dry. Check the product label for drying times.
- Sand lightly between coats. This helps the next coat stick better.
- Apply the second coat. Use the same method as the first coat.
- Add a final sealer. This will protect your new finish and make it last longer.
- Allow proper curing time. Don’t use the floor until it’s fully dry and cured.
The next step is to think about other aspects of your basement remodel.
Basement Finishing, Remodeling, and Renovation Considerations
Basement finishing involves more than just picking a floor. You need to think about moisture control and insulation too. A sump pump, French drains, and graded landscaping help keep water out.
Adding a dehumidifier cuts down on dampness. These steps protect your new floor from water damage.
Insulation is key for a cozy basement. Rigid foam insulation on the walls blocks cold air. A plywood subfloor over foam insulation keeps the floor warm. This setup makes your basement warmer and more comfy.
It also saves money on heating bills. With these basics in place, you can focus on picking the perfect floor finish for your space.
Conclusion
Finishing concrete floors in basements offers many benefits. It improves the look and feel of your space while protecting against moisture. With options like epoxy coatings, stains, and vinyl planks, you can create a stylish and durable floor.
Proper preparation and application are key to a professional result. A well-finished basement floor adds value and comfort to your home for years to come.
FAQs
1. What are the best options for finishing a basement’s concrete floor?
Popular choices for finishing basement concrete floors include paint, epoxy, stain, tile, and vinyl flooring. Each option offers unique benefits. Paint and epoxy are affordable and easy to apply. Stains give a natural look. Tile and vinyl provide durability and moisture resistance.
2. How do I prepare my basement’s concrete floor for finishing?
Start by cleaning the floor thoroughly. Fix any cracks or damage. Check for moisture issues using a plastic sheet test. If needed, apply a waterproof sealer. Ensure the surface is smooth and level before applying your chosen finish.
3. Can I install hardwood flooring directly on my basement’s concrete slab?
Installing hardwood directly on concrete is not recommended. Concrete can hold moisture, which damages wood. Instead, use engineered wood or laminate flooring with a moisture barrier. These options mimic hardwood’s look while offering better protection against humidity.
4. What are the benefits of staining a concrete basement floor?
Concrete stains offer a cost-effective way to enhance your floor. They come in many colors and create unique patterns. Stains absorb into the concrete, making them long-lasting. They’re easy to maintain and can protect against wear and tear.
5. How do I maintain my finished basement concrete floor?
Regular cleaning is key. Sweep or vacuum often. Mop with a pH-neutral cleaner. For painted or epoxy floors, avoid harsh chemicals. Reapply sealers as needed to protect the finish. Use rugs in high-traffic areas to prevent wear.
6. Is it possible to DIY basement floor finishing, or should I hire a professional?
Many basement floor finishing projects can be DIY. Painting, staining, and installing floating floors are often manageable for homeowners. However, for complex jobs like polishing concrete or installing tile, hiring a professional ensures the best results and can save time and frustration.